Order Clinical Tests
Note: Because LabOnline is customizable based on laboratory needs, some of the options referenced in the steps and images below may not be available or may be named differently. Direct any questions to your laboratory.
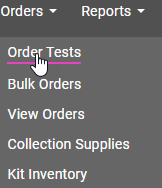
To open the Order Tests page, click Orders from the main menu. Then, select Order Tests from the submenu.
Select a client and profile from the Client name and Profile name drop-down lists.
Note: Based on the configuration of the profile you have selected, this section (or specific fields in this section) may not be available.
Search for the patient by entering a search criteria using the format suggested in the search field. You may optionally enter the patient's date of birth to narrow the search results. Click Search.

Potential Matches
In the Potential Matches pop-up window, find the patient name from the listed matches in the Patient Name column and click the name link.
Existing Entry
This section opens the patient record for the name you selected. From here, you can edit the existing entry or create a new record. When you click edit, the entry fields are enabled and you can make changes to the existing entry record, including insurance information and additional patient information.
Note: The Add document feature is configured in LabOnline LabOnline Manager. If it is not visible here, see your System Administrator for more information.
Insurance Information
When you select a Insurance Carrier, additional fields appear below the selected carrier.
New Entry
You click the Create New button to close the Existing Entry record and open a new patient order form where you enter the patient's information. The Additional Patient Information and Add Samples & Tests sections are also enabled.
Note: If the order template contains both patient DOB and age, the DOB field takes precedence. When the birth date is entered, the age is calculated and shown in the age field, and the field is then disabled. The age appears in years, unless the birth date is less than 12 months. If the Patient DOB is empty, you can enter the age and age units.
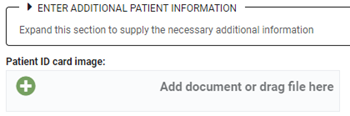
Expand Enter Additional Patient Information
to enter referral and medication information about the patient for whom
you are ordering tests. You can also upload images such as a patient's ID or a document related to the patient information. Click the plus (![]() ) icon to upload an image and/or drag a file as shown in the image that follows.
) icon to upload an image and/or drag a file as shown in the image that follows.
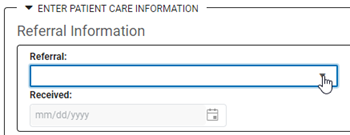
Add Referral or Medication Not in the Drop-down List
If the name of a referral or medication that you want to add is not visible in the Referral or Medication drop-down list, type the name to filter to it, and then, select the name so that it appears in the field.
Add a New Medication
Click add  to the right of the Frequency drop-down
list in Medication Information.
A new row containing the Medication,
Dosage, Units, and Frequency fields appears.
to the right of the Frequency drop-down
list in Medication Information.
A new row containing the Medication,
Dosage, Units, and Frequency fields appears.
Enter or edit sample details and test information, including any special instructions in the Add Samples and Tests section.
Notes:
- When this panel is collapsed, it displays the number of entries in the panel (e.g. No entries, 1 entry, and so forth).
- When you click Add in the Samples panel, you can enter sample-specific values for Sample ID, Line Item, Matrix, Sample description, and Auxdata.
- The Line item drop-down list is populated based on the profile you have selected.
- Selecting a line item displays the associated test details in the Tests panel.
- You can optionally enter the description of the sample in the Description field at the bottom of the Tests panel.
- The comment field is a text field in which you enter comments about your order.
- If the line item or any selected tests require additional information, expand the Enter Additional Information section to enter the required fields.
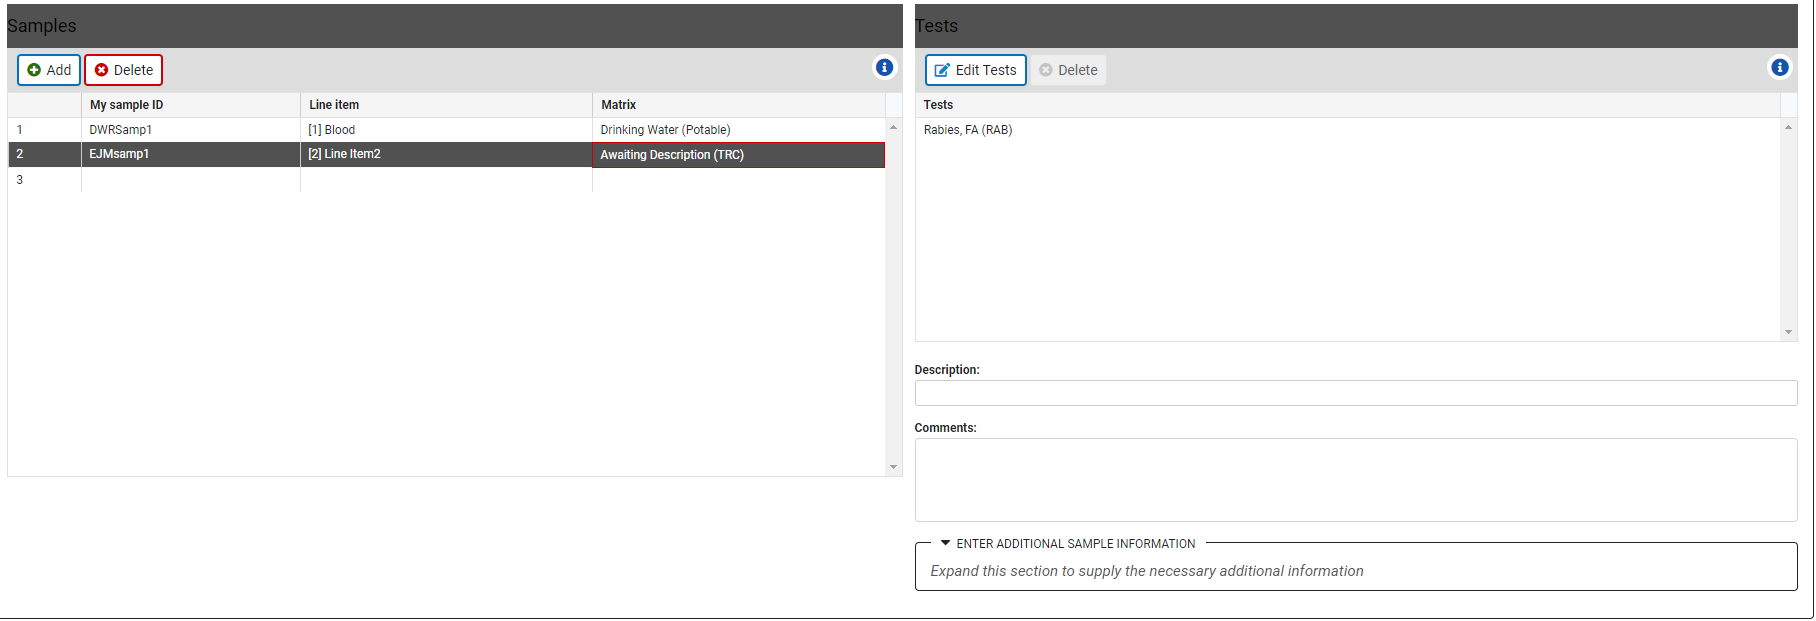
Edit or Add Samples
In the Samples grid on the left side of the page, select the row containing the sample whose details you want to view in Test panel to the right of the grid. Edit the information as needed.
To add a sample, click Add  to add a row in the Samples grid, then click in the Sample ID to enter a specific value for the Sample ID, and click Line Item, or Matrix
field then select an option from the drop-down list for that new sample.
to add a row in the Samples grid, then click in the Sample ID to enter a specific value for the Sample ID, and click Line Item, or Matrix
field then select an option from the drop-down list for that new sample.
Edit or Add Tests
To edit or add tests in the Tests grid, click Edit
Tests  .
.
In the Edit Tests window, move tests to and from the Available Tests and Selected Tests panels using the left and right arrows, then click Done. The tests in the Selected Tests panel appear in the Tests grid.
Expand Enter Additional Information to enter auxiliary information. The options in this section are determined by the line item and tests you have selected. After selecting a line item, if at least one auxiliary data format exists, the additional information section will display a label that shows the section can be expanded. This section is collapsed and disabled if there is no auxiliary data inside.
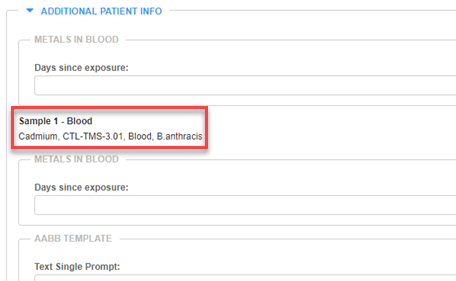
The information from the line item displays all the associated fields and you can enter required data as needed. A summary of auxiliary data for the ordered tests is displayed as highlighted in the following figure.
A patient's wet signature (physical signature) maybe required based on Profile settings and must be captured before submitting an order for review or approval.
Warning: A complete check of the order should be performed to ensure that everything required is included. Once signed, the order process is configured to not allow changes.
Click Add Signature in Patient Approval.

In the Add Signature pop-up, the patient must sign then click Add Signature.
Note: This pop-up may contain laboratory disclaimer information.

The Delete Signature button appears after you accept your signature. If you click Delete Signature, you are prompted with a warning that you cannot submit the order until the patient signs again.

The buttons available at the bottom of the Order Tests page vary depending on your user permissions:
-
If you are a user with approval permissions, click Order Tests to submit your order for processing. A Chain/Requisition report is created and opens in your browser.
Note: If the collection date for the kit is after the kit's expiration date, you will see an error message.
-
If you are not ready to submit the order, you can click Save and return to the order to submit at a later time.
Caution: Once an order is saved, you cannot change the kit, but you can still change the collection date. If the collection date is after the kit expiration date, you must delete the order and start a new order.

-
If you are a user without approval permissions, click Submit for Review to submit your order for review and approval.
A user with approval permissions must reopen your order to review/approve it before it is submitted for processing. If you are not ready to submit the order for review, you can click Save and return to the order to submit at a later time.Note: If the collection date for the kit is after the kit's expiration date, you will see an error message.
- If you have entered all required information in the fields above, a
message appears at the top of the page with the chain of custody number.
See: Order Tests Page Field Descriptions for descriptions of the fields on this page.